Hydration System questions

jsoque

Premier Member
#21
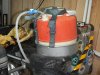
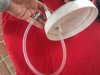
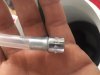
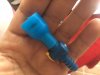
Silly goose. Should have been a little more descriptive, and included pics. So here we go; I figured out some flaws from my first attempt, albeit minor ones, and this was my new one with no issues! I dropped the fish tank motor into the bottom and used a piece of copper tubing to ensure it would stay down level instead of just arching the tubing like the original. This also gave me a good tight fit at the hole in the side. This stopped the small leak I dealt with before when the liquid level was over it, still I sealed it with silicone for insurance. Also, to eliminate the potential for other leakage, I ran the wire from the pump to the switch up the inside of the plastic tubing, which really should be insulated. I chose to run it in through the side instead of the top since I like to fill the cooler with a lot of ice before leaving a hotel, and didn't know if it would be a pain twisting the pump around putting on the lid. View attachment 2162

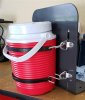
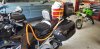
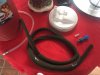
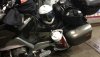
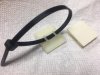
The momentary SPST switch is attached through a hole in a piece of really thin metal to hold it at a convenient angle, attached to the tubing with a couple of zip ties. So nice to just thumb the switch to have flavored water powered up the tube! I keep it in reach running it under the tank bag straps, and clip it to a retractable keyring on the handlebars for convenience! I have my battery tender cable coming out from under the seat on the right side of the bike, and mount the cooler on that peg. You can see power is supplied to the tank pump simply by plugging it in where the charger would normally plug in!
View attachment 2163
The hydration system has been a wonderful plus with less fuss, and a lifesaver on a few rides that fluctuated between 110 and 114 for the entire day...
GTF - You Are The Man !!!
 

jsoque

Premier Member
#22
Have a Back Rest on my '10 12RT, so I updated from a Camelbak hydration system since 2016. This time I went with the 1 Gal. Igloo Drink Cooler, 3/8" ID. Surgical Tube, Neoprene Insulation Tubing (Paxemen), and a Camelbak mouthpiece at the drink end. I used a 'Flyfishing Zinger' on my Tank Bag end to keep the mouthpiece close at hand, so it retracts when I'm done sipping. I used a plastic Quick Connect at the bottom end that enters the Drink Cooler and on the 16 inch long insertion piece of surgical tubing. This needed some weight, so I used a 3/16th inch hex head socket as a 'Clunk' on the end of the drink tubing to keep it in contact with the bottom. I kept things in place and ziptied the 3 + feet of drink hose using cable tie supports with double stick mounts on 4 various spots on the Left side of bike and then bungied the Igloo Drink Cooler onto my Left Side Crash Bars. Every time I wanted to refuel my drink container, I unscrewed the top, took a 'Big Gulp (TM)' of ice from the store, and dumped it in there, then, I poured a whole 1 Liter of Gatorade into it and screwed tight [One should never sip straight Gatorade!] The ice melting serves two purposes, dilutes the drink contents, and, keeps the drinks nice and cold. Here's some pics to help with the explanation.
Jim S.
 

Attachments

#23
The key to keeping camelbak’s fresh is to ensure everything is separated and open to completely dry. In a lot of situations,
Camelbak’s are just the ticket. That said, on my mostly-100F BbG1600to Texas, I found some stores had ice dispensers that made it all but impossible to fill up cleanly. It led me to stop refilling my bak due to the time cost and hassle (my fuel stops are usually just that- long enough to grab 5 gallons and snap a picture of the receipt and odometer). As a result, I ordered a cooler hydration system from Garauld TechWorks that will mount to a spare right side passenger peg.
 
#25
Have a Back Rest on my '10 12RT, so I updated from a Camelbak hydration system since 2016. This time I went with the 1 Gal. Igloo Drink Cooler, 3/8" ID. Surgical Tube, Neoprene Insulation Tubing (Paxemen), and a Camelbak mouthpiece at the drink end. I used a 'Flyfishing Zinger' on my Tank Bag end to keep the mouthpiece close at hand, so it retracts when I'm done sipping. I used a plastic Quick Connect at the bottom end that enters the Drink Cooler and on the 16 inch long insertion piece of surgical tubing. This needed some weight, so I used a 3/16th inch hex head socket as a 'Clunk' on the end of the drink tubing to keep it in contact with the bottom. I kept things in place and ziptied the 3 + feet of drink hose using cable tie supports with double stick mounts on 4 various spots on the Left side of bike and then bungied the Igloo Drink Cooler onto my Left Side Crash Bars. Every time I wanted to refuel my drink container, I unscrewed the top, took a 'Big Gulp (TM)' of ice from the store, and dumped it in there, then, I poured a whole 1 Liter of Gatorade into it and screwed tight [One should never sip straight Gatorade!] The ice melting serves two purposes, dilutes the drink contents, and, keeps the drinks nice and cold. Here's some pics to help with the explanation.
Jim S.
Okay, really slow with response... love the Neoprene insulation, know it is needed, just didn't know which way to go! I see we used the same cooler, but I didn't use a quick disconnect, great idea that would solve some issues! Don't know what the "Zinger" is but I perceive it accomplishes the same thing as my retractable key ring, which stays on my steed (zip tied to handlebar) for the purpose of retaining my "smart badge" that gets me through the gate at work. I concur about not using straight supplements like Gatorade, I instead use the "squirty things" from the grocery store to give it flavor (and caffeine or electrolytes) to encourage drinking more. I do like the double stick mount idea, and use the bungy cord also, although I am trying to come up with a different mounting system that might facilitate a (more secure and) quicker removal for hotels... Thank you so much for the input and ideas!
 
#26
OK, so in prepping for my BBG 3K, I decided to use the water jug and drink tube instead of my CamelBak. I took the drink nozzle from the Rubbermaid jug and, using a 1/2" drill bit, drilled the opening larger to accommodate the CamelBak tube w/cover. I had to do some work to clean-out the nozzle but it was a success. Too bad I did it too late to really test before the ride! :)
 
#29
Well while using the Camelbak tube and water jug worked, the tube was really kinda short. I bought some tube from Lowe's and set things up and went out on another LD ride. Well, I discovered that I didn't check to see if the damn tube was food grade (it wasn't), so it had an unpleasant taste and odor. Consequently, I didn't really hydrate as well as I did on my previous ride.

I found a supplier on Amazon and got 10' of FOOD GRADE tubing, 3 sets of orange "insulated" tubing cover from a vet-owned store on Amazon, and now all is good.
 

SteveAikens

Premier Member
IBR Finisher
#31
It's simply some aluminum strapping wrapped around a Coleman jug and is attached to the footpeg mount on the right side. I'll see if I can find my notes on who made it for me but that was 10 years ago soooo --- ☺
 

EricV

Premier Member
IBR Finisher
#33
The easy and inexpensive way to make a jug mount/base is to take your jug to the WalMart and find a cheap pot or dog dish that it fits nicely into. I recently made one for an IBR rider using a $5 on sale aluminum pot. Drill/grind off the handle rivet heads and punch out the rivets. Remove the foot peg rubber. Align the pot on the footpeg and mark for holes, (you will want one major bolt and a smaller one to prevent rotation). Drill the pot. Re-position on the foot peg and mark and drill the foot peg. Install a pan head or other low profile bolt with washer and nylock nut, plus the additional smaller bolt. (I tapped the smaller hole for threads to simplify things). Some blue loctite on the smaller bolt in this case.

Then I cut a piece of old camp pad to fit into the bottom of the pot so the bolt head will not wear into the bottom of the jug.

In many cases I drill some additional holes to use for bungies to secure the jug into the base/pot. Freezer tubing is more rigid than the normal drink tubing. A piece of this can be used to insert into the jug, either thru a side hole you make or a hole in the top or lid, as you prefer. Angling thru the side works well if you keep it as high as possible, (silicone RTV sealant optional). The freezer tubing is food grade and comes in different sizes. I find 1/4" too small for a good drink and 3/8" too big, (lots of sucking air before you get water), so prefer 5/16" diameter tubing.

For some jug and bases I have used a cake pan or dog dish. I sometimes cut slots with my dremel tool and use 1" webbing to form a harness to secure the jug. Using quick release strap connectors readily available at any camping store and many hardware stores. Nearly any equine repair shop will sew you a custom harness out of the webbing straps for low cost. The last two I've made up cost $3 and $5 for the sewing work.

Here is my current 1 gallon Igloo jug mounted to the tail of the bike with a cake pan and webbing. Note the Camelbak quick release fittings, (2), that allow fast removal for filling. One is at the front of the bike to allow removal of my tank bag w/o removing the drink tube and retractor. This jug will keep ice in it all day and into the next if I'm not drinking the water faster. Far better insulation than my wife's Bubba Keg. The jug was purchased off Ebay for $5 with free shipping and was in virtually new condition. I spent about $40 on the entire set up. Most of that being for the two Camelbak Q/R fittings and the bite valve.

The semi rigid tubing runs up to the front of the bike, kept in place with a few zip ties. Then at the front Q/R fitting it changes to more flexible food grade tubing that ends at my tank bag with a key retractor and bite valve. No insulation on the tube as I prefer to blow the water back into the jug after a drink instead of attempting to keep the water in the tube cool. This particular jug came with a pour spout, which was perfect for drilling for the tube insertion. I drilled a very small hole in the center fill cap for vent purposes which works very well w/o allowing anything in, since the very small hole is under the webbing.

UNADJUSTEDNONRAW_thumb_e67.jpg
 
#34
It's simply some aluminum strapping wrapped around a Coleman jug and is attached to the footpeg mount on the right side. I'll see if I can find my notes on who made it for me but that was 10 years ago soooo --- ☺
I'm really wondering how you did the bends? Do you have an English wheel or did you hammer them around a template or something along those lines?
 
#35
So here's what I have now- a friend suggested using these heavy-duty tie-downs and what do ya know?- it works really nice! I took a set of channel locks to the S-hook on the strap side and closed the loop so that the end wouldn't catch on things. I then rotated the straps so that the hooks going into the rings come in from the backside.

So this is what I am rocking...the picture of the whole system is a little older as I purchased another length of orange insulated cover for the tubing and now the entire drinking tube is covered. The picture also doesn't show the rings in the backrest, where the straps are connected. The spout in the jug was drilled-out with a 1/2" bit so that the tubing can go right in from the top, making refilling the jug even easier. I haven't needed any weights on the end of the tube to keep it in place. There is a vent next to the spout that opens when the spout is in drinking position.

In the future (hopefully sometime before the end of the summer), I am planning on installing a 4-gallon auxiliary fuel tank where the backrest and 1-gallon Rotopax can are now and then I'll have a better mount for the water.
 

Attachments

EricV

Premier Member
IBR Finisher
#36
I'm really wondering how you did the bends? Do you have an English wheel or did you hammer them around a template or something along those lines?
Steve didn't make it himself. The fabricator likely didn't use an english wheel. That skilll set is getting hard to find and while possible to use to bend the aluminum flat stock, a simple brake with a round form would be a lot quicker and easier. Especially if the person understands heating aluminum well. Less stress fractures in the aluminum structure if you heat it to the correct temp before bending.
 

jsoque

Premier Member
#37
So here's what I have now- a friend suggested using these heavy-duty tie-downs and what do ya know?- it works really nice! I took a set of channel locks to the S-hook on the strap side and closed the loop so that the end wouldn't catch on things. I then rotated the straps so that the hooks going into the rings come in from the backside.

So this is what I am rocking...the picture of the whole system is a little older as I purchased another length of orange insulated cover for the tubing and now the entire drinking tube is covered. The picture also doesn't show the rings in the backrest, where the straps are connected. The spout in the jug was drilled-out with a 1/2" bit so that the tubing can go right in from the top, making refilling the jug even easier. I haven't needed any weights on the end of the tube to keep it in place. There is a vent next to the spout that opens when the spout is in drinking position.

In the future (hopefully sometime before the end of the summer), I am planning on installing a 4-gallon auxiliary fuel tank where the backrest and 1-gallon Rotopax can are now and then I'll have a better mount for the water.
Hey RT Pilot - Nice hydration system you got in your K16!! I’d think about a clunk still. I also had to drill out my opening to 1/2” but it was fine. Forgot who asked, but a Zinger is a Fly Fishing accessory that resembles a belt key fob zinger as well. I usually have a clothes bag on my pillion seat so my jug is bungi strapped to my rear crash guards and not the seat back of the top case.
Good luck and keep posting those nice pics!
Jim
E: jsoque at gmail dot com
 
#38
LOL, it's a '16 RT, and if you look closer at the tankbag, you can see I have a retractable thingy attached.

I like putting my feet on the passenger pegs to give me a different layout once in awhile, so putting the jug down there really wasn't an option for me.