Adding a taildragger to my GL1800 - Learning as I go

Shawn K

Professional Cat Confuser
Premier Member
#1
I know that adding a fuel cell to a Gold Wing isn't what you'd call "something new", but I decided to go my own way a little bit.

A while back, I bought a taildragger setup from a forum member. It was quite nice, and was definitely "plug and play". I was told that this particular fuel cell had seen life with a couple different members, and had even been used in an IBR. There used to be a "Dread Pirate Kermit" sticker on it before I bought it, if that tells anyone anything.

(Way more posts to come...)

Resized_20220503_231756.jpeg
 

Shawn K

Professional Cat Confuser
Premier Member
#2
The unit was designed to be crazy easy to remove - just undo the retaining pin on the hitch, disconnect the fuel tubing and electrical plug, and pull the whole unit off. No body modifications of any kind. I was quite interested in that.

The longer I looked at it, though, the more I became dissatisfied with the length of the whole setup. When I'd look at it from the side, it seemed like there was this big, heavy fuel cell hanging waaay out the back, and the thing I really wondered about was the reduced AOD (Angle of Departure) and the stress on the trailer hitch and draw bar of having close to 60 pounds of weight on a somewhat long lever. It may have been nothing at all (after all, this cell had been owned and used by multiple people before me), but as I was looking for a project anyway, I decided to see if I could improve on the idea.

My design brief (such as it is) centered around a few items:

1) Get the cell as close to the bike as possible
2) Get the cell as high as possible without interfering with the visibility of the stock lighting
3) Make the cell assembly as light as possible
4) Keep any bodywork modifications to an absolute minimum

In the end, I think I did pretty well.
 

Shawn K

Professional Cat Confuser
Premier Member
#3
Before anyone asks, I chose a taildragger setup because I use the Wing for work as well as recreation. I have a company that provides motorcycle escorts for triathlons and other events, so I want to enjoy the benefits of the longer range while still being able to carry race officials or other passengers. Plus, having the pillion seat unobstructed gives me more room for baggage on solo trips.

I spent some time researching what sorts of taildragger setups people had done before me. Most of what I saw was the traditional setup like in the picture above, but I did find one photo of Lisa Landry's very sleek, almost OEM-looking setup that I believe was done in conjunction with Firecreek Accessories (?). Super tidy and way cool, but it wouldn't be the same design with my across-the-back light bar on the '12-'17 Wing (as opposed to Lisa's pre-2010 model), I don't have those kinds of fabrication skills, and I wasn't interested in spending that kind of money. So I decided to stick with a basic round aluminum tank.

The first order of business was to get dimensions. And so, utilizing the latest in CAD technology (Cardboard Aided Design), I fashioned a dummy tank, removed the rear fender, and tested for diameter and length.

20220624_182501.jpg

20220624_183634.jpg
 

Shawn K

Professional Cat Confuser
Premier Member
#4
Once I figured out the length, I then adjusted the diameter as needed to get the the capacity I desired. I then called up BAM Engineering, who made a custom tank to my dimensions. It ended up being 12" in diameter and 9.5" long, for a capacity of 4.65 gallons. Coupled with the Wing's 6.6 gallon tank, you're looking at 11.25 gallons total.

About two weeks after placing my order, my tank arrived. I had them leave it rough finished, mostly because I didn't know how I wanted to finish it, and I didn't want to pay any extra.

After that arrived, I took some measurements for the tank mounting rings and had a local fab shop weld me up a new draw bar that was just big enough for what I needed (the draw bar I had for the other tank much longer because of the shape of the tank, and I wanted to drop as much weight as possible).

20220801_140617.jpg
 

Shawn K

Professional Cat Confuser
Premier Member
#5
Once I got that back from the fab shop, I drilled it accordingly, mounted the tank rings, and took a look at what I had so far. In the end, I would end up purchasing some 1"x1" aluminum spacers to lift the tank enough for me to get the bung screwed in to the bottom of the tank, but still keep the tank itself under the height of the tail lights.

20220918_204243.jpg
 

Shawn K

Professional Cat Confuser
Premier Member
#6
The next question became, "Where do I put the fuel pump?" I briefly thought about fabricating some kind of mounting plate that would attach the pump directly to the tank rings, in the interest of being able to remove the whole assembly in one piece if needed, just like the original tank assembly that I bought. In the end, though, I decided to trade easy removability for light weight and making as many components do double-duty as possible. So I decided to mount the pump directly on the receiver hitch. Since I wouldn't be able to drill through the receiver (it would interfere with me installing the draw bar), I would ultimately end up using 3M Dual-Lock, along with zip-tying the pump to the receiver through holes drilled in the pump's mounting lugs. Once all of the fuel tubing and wiring is in place, the pump's not going anywhere, and the hitch itself would provide a lot of protection for the pump.

This picture is from much later in the process, but it shows very clearly how the pump sits and how it's shielded from things being flung off the tire.

20230609_200821.jpg
 

Shawn K

Professional Cat Confuser
Premier Member
#7
I was never a big fan of drilling a fuel tap into the Gold Wing's sending unit. I know it's been done many times, and if done correctly the chance of leakage is minimal. But since the sending unit is below the max level of the tank to begin with, I didn't want to run the risk of creating a problem.

I had spoken with @Auburn many times about this project (he's probably sick of discussing it by now... ;) ), and we had the idea to mount an NPT fitting into the top of the tank, way up at the front, and have the fuel spray in like a shower head. After I very bravely let Bryan be my test Guinea Pig, he reported that experiment worked just fine on his bike. Later, when he would sell that bike to buy his current one, I very bravely purchased his modified tank, moved the fitting a couple inches forward (owing to differences in hardware placement between different model years of Gold WIng), and transferred the pump and sending unit over from my tank.

20230523_200121.jpg
 

Shawn K

Professional Cat Confuser
Premier Member
#8
Instead of running the fuel tubing down the left side of the bike (a major pain in the arse with all of the items in the way), I very intelligently noticed that there was a right side to the bike, which didn't have nearly as much crap in it. So I purchased 6 feet of fuel tubing (surely 6 feet is enough... right?), snaked the tubing around the front of the tank to the right side of the bike, ran it all the way to the back wheel, and discovered that what was needed was 6 feet and 6 inches of fuel tubing.

C'est la guerre...

20230525_162313.jpg
 

Shawn K

Professional Cat Confuser
Premier Member
#9
Since I had already removed all the bodywork and was tired of the spider nest of wiring going to the battery terminals, I decided to purchase a power distribution block and install it in the one place under the seat where it could possibly fit.

Note to Honda: It's very rude of you to not design your Gold Wings with consideration to the fact that I may want to put something under the seat that you never meant to be there. Please do better.

Screenshot_20230616_095556_Gallery.jpg
 

Shawn K

Professional Cat Confuser
Premier Member
#10
Over time, I decided to paint the tank gray to keep the temperature down and try to keep things as nice looking as possible. In retrospect, maybe I should have just polished the tank and sprayed it with clear. You live, you learn.

To keep the steel tank rings from having a galvanic reaction with the aluminum tank, and also to keep the rings from digging away at the paint, I ended up covering them with some industrial grade 1.5", adhesive backed shrink tubing. Later, I'd end up grinding away a small patch on the bottom of the tank so that I could sandwich a grounding strap between the tank and the tank ring, which then went to the draw bar, and through the wiring plug up to a frame ground.


IMG_20230601_153326_590.jpg
 

Shawn K

Professional Cat Confuser
Premier Member
#11
I then fashioned up a license plate bracket with some 1" x 1/8" steel, primed and painted, with some shrink wrap over the ends. This was then sandwiched between the tank and the tank rings, and when the rings were tightened down, the bracket was solidly in place.

20230608_163037.jpg
 

Shawn K

Professional Cat Confuser
Premier Member
#13
To add the final bit of spit-'n-polish, I purchased a second rear fender, cut out an appropriate hole to go around the tank, and used a piece of soft rubber from a door sweep to make a sort of gasket that would form around the tank. It's purely aesthetic and serves no real functional purpose, but it keeps the back end from looking like an unfinished mess.

20230615_191056.jpg
 

Shawn K

Professional Cat Confuser
Premier Member
#14
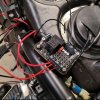
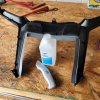
I tested the system last night by siphoning out a half gallon of gas from the main tank and putting it in the aux tank.

CRAP! THE FILTER'S NOT TIGHT! :eek: 
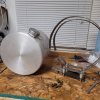
My inline fuel filter was a 2-piece aluminum design with cleanable media, and the top wasn't screwed on fully. Gasoline all over the place, and my wife wasn't thrilled about the smell.

After scurrying around like a madman, I'm pleased to say that the system appears to be gas-tight. When I hit the pump, it pumped a half gallon of gas in approximately a minute. So I call that a win. I'll test it more later this weekend.

So back to the original design brief. The goals were:

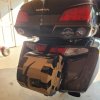
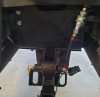
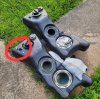
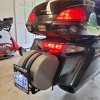
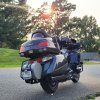
1) Get the cell as close to the bike as possible - The fuel cell is within 1 inch of the trailer hitch assembly, which gives me just enough room to run wiring and fuel tubing.

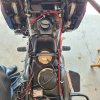
2) Get the cell as high as possible without interfering with the visibility of the stock lighting - Done. Any higher, and I'd have to make lighting modifications.

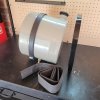
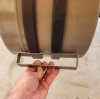
3) Make the cell assembly as light as possible - Total empty weight of fuel cell assembly is 11 pounds, 4 ounces. For the sake of comparison, the cell assembly I bought before weighed 35 pounds. Given that gasoline weighs approximately 6 lbs./gal, the total fueled weight of my fuel cell assembly should be approximately 39 pounds.

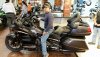
4) Keep any bodywork modifications to an absolute minimum - The only piece of bodywork that I modified was a second fender. The original one is in stock condition, and can be put back on the bike any time.

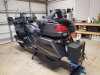
So that's my taildragger. It was a lot of extra work, just to make up for the fact that I wanted it to be closer and higher than the one I originally bought. But now it's mine and there's not another one 100% like it.

I'll let you guys know how the shakedown cruises go. I have a trip to Long Beach, CA coming up in July, and wanted the extra fuel ready to go before then.
 

Shawn K

Professional Cat Confuser
Premier Member
#15
Took another trial run at putting fuel in the aux tank. Siphoned about 2 gallons out of the main tank and put in in back. Left it sitting there for several minutes, no leaks or dampness detected.

It took about 4 minutes to pump roughly 2 gallons of gas. Seems acceptable to me. Also, having the fuel feed into the main tank from the top makes it very easy to conform visually that fuel is being pumped in - you can see the splashing around inside the tank when the fuel goes it.

I think I'm going to call this project "Finished". :)

20230616_192252.jpg
 

c10

Well-Known Member
#16
Your fit and finish work is outstanding . The tank to grey color is a good choice . FYI that is my favorite color and generation wing . I should of bought this one when the latest gen was coming out . I guess I missed it so what does this cell hold ?

Never mind I see 4.x gallons

c10 on 2017 wing.jpg
 

Shawn K

Professional Cat Confuser
Premier Member
#17
I guess I missed it so what does this cell hold ?

Never mind I see 4.x gallons
After my last 5600 mile trip to Long Beach and back, I found that at 75 mph, the combined fuel load is good for about 400-420 miles. At 80 mph, that drops to about 380-400 miles.

Either way, it gets me the 350-mile max limit between DBR's, with a little bit in reserve. I now start looking for fuel at approximately 310-320 miles.
 

EricV

Premier Member
IBR Finisher
#20
Very nice. Looks great and I hope it works well as long as you have it. I see that the aux tank cap is different from the first pic in the raw to the final painted versions. Is the black fuel cap internally tethered?